The TJ is really coming together now, but we mustn’t get ahead of ourselves and overlook the basics, and with that in mind this month we visit G-force Autos based in Halifax for a thorough mechanical check over and service.
Words and photography: Matt Carson
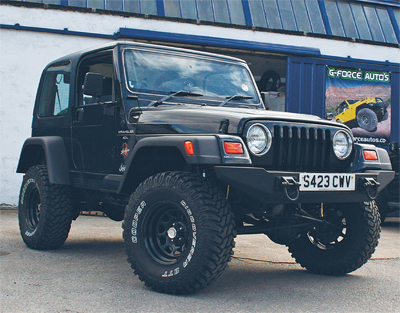 G-force is a relatively new company, but has quickly become established, and gained a well-deserved reputation for selling, servicing and supplying Jeep accessories. G-force is a Rugged Ridge accessories premier dealer and Skyjacker Suspension main dealer and can order in just about anything you might want for your Jeep. What marks G-force out is that they also maintain a comprehensive stock of bumpers, suspension and the more popular accessories, therefore minimising any shipping delay from the USA.
Proprietor of G-force Autos, Trevor Taylor, is a long time Jeep fan and he and his team know their way around a TJ so I shouldn’t have been surprised that while I was helping myself to a cuppa in their showroom, they had lifted the TJ onto the ramp and already drained the oil and were asking me to pass over the new filter. I’ve chosen to use a K&N filter for the TJ following previous positive experience with my Grand Cherokee. The filter is more expensive than most but the quality is top drawer and I’ve every confidence in K&N’s claims regarding superior filtration and high flow rates. I also love the one-inch nut moulded into the top of the filter case, making it the easiest filter on the market to remove.
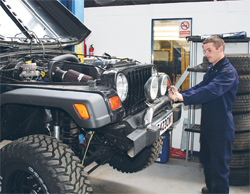
While I snapped a few pics of the Jeeps G-force had for sale, Trevor had the spark plugs removed and the fan belt slackened off ready to remove. The speed being an indication of just how great the TJ is to work on, lots of space, nice and simple and the G-force guys could probably service one in their sleep.
The spark plugs removed from the engine looked in good shape, not oily just a nice clean burn. You can tell lot about an engine from the state of the plugs, so this was a reassuring sign.
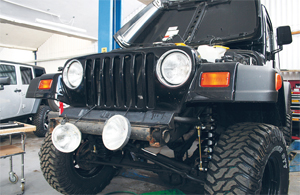
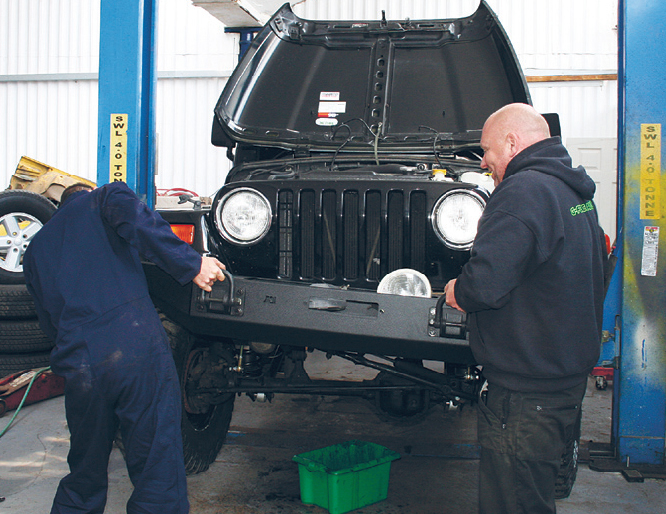
So far it’s all been a bit too easy; however, I had a trick up my sleeve in the form of a replacement exhaust header that needed fitting. Anyone in the Jeep fraternity will know that the 4-litre exhaust header manifold is prone to cracking and that it can be quite ‘challenging’ to fit. Being a straight six layout, the header is quite long and an awkward shape. With the bit between their teeth the G-force chaps pressed on and soon had the inlet manifold and ancillaries removed, and were scraping knuckles trying to remove the original lump of iron which Jeep thought would make a good header. Once off the car, and compared to the Rugged Ridge hi flow replacement, the difference was clear to see. The Jeep item is a very basic design and true to form had cracked significantly in two places.
It’s been a long time coming, or rather going, the old bumper is on the way out
The spotlights will have to go for now – but I will reconsider auxiliary lights at a later date
It’s a two man job to present the new XHD bumper up to the Wrangler for fitting
Much better! The XHD is a serious piece of kit and much improved over the original
Clearly built to a price, and a low one at that, it was now well past it’s best. What you can’t see is how much this lump weighs; it would make a good anchor for someone’s boat! The Rugged Ridge replacement is not only better made in stainless steel, it’s also better designed with a slightly increased bore and a more performance oriented layout to increase flow. It’s also a fair bit lighter and the areas prone to cracking on the original have been further strengthened to prevent a similar re-occurrence. The new header maintains the stock exhaust location but as it’s a slightly different shape there was a bit of trial and error before the boys managed to coax the header into place. Subsequently, once loosely in position the header then perfectly lined up and tightened down without further problems. It really is a quality product and matched up to the existing exhaust perfectly. One tip: if you ever have a go at replacing your own header, be sure to use a penetrating spray to liberally spray all the studs and nuts regularly for a few weeks in advance, it’ll pay dividends if you manage to avoid damaging a stud when you finally break out the spanners.
After reassembly of the fuel rail and electrics it’s job done and time to replace that tired fan belt which is as straightforward as it gets. We didn’t change the coolant as I’d already handled that myself earlier in the year and likewise for the diff and gearbox oil.
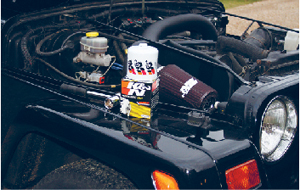
Last but not least is that K&N intake. We’ve junked the stock intake and restrictive pipework and bolted on the rather purposeful K&N item. K&N need no introduction when it comes to filtration and this item lives up to the company’s impressive reputation. K&N intakes are designed to reduce intake restriction as they smooth and straighten airflow and in this application (Part no: 57-1514-1) the dyno’d results of an extra 12bhp speak for themselves. Fitting is a 15 minute job and as expected the fit and finish is superb. And, the ability to wash and re-use the filter a real bonus, no doubt saving some money in the long run. The K&N intake location is nice and high, on top of the inner wing and about level with the headlight. At this point you may be asking why not fit a snorkel? My thinking is that if the water we’re one day theoretically crossing gets so deep that it’s sucked into the engine, then we are probably screwed anyway and a bit of water in the engine will be the least of my worries. I have however fitted a K&N Drycharger sleeve (Part no: RF-1045DK) over the filter, which doesn’t restrict airflow but does protect against splashing water. No doubt some of you would still rather go the snorkel route, but I’m confident that this set up will be fine, I also prefer the cleaner look of having the intake tucked away under the bonnet.
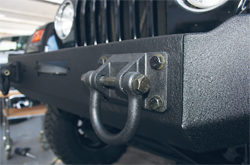
 So what about that bumper? Well it’s always been my intention to fit a winch to the TJ so we need a purpose made winch bumper rather than try and weld a plate and hash up the original. Trevor suggested the Rugged Ridge XHD design you see here and I’m a big fan. It’s more than beefy enough, constructed from heavy gauge steel and nicely finished in a textured powdercoat coating.
Removing the original bumper is a simple nut and bolt affair, that’s the beauty of these Jeeps, nothings too tricky or involves fancy fittings. The XHD bumper attaches directly to the chassis rails for maximum strength and after initially just loosely attaching the bumper; Trevor adjusts it slightly to ensure it’s perfectly aligned before fully tightening down.
The new look is a real eye opener and in my opinion much improved over the stock setup, I never was a fan of the original chrome hoop setup and much prefer the new mean and moody look. I’ve also ditched the spotlights for now and will perhaps take another look at auxiliary lighting after fitting the winch. The bumper is also available in a non-winch style and with loads of other options to customise to your particular tastes. Best call Trevor or visit the G-force website for more info, details below.
THANKS
I like to thank Trevor and the staff at G-force for there very warm welcome, endless tea, and comprehensive help. G-force’s substantial indoor showroom is a Jeep lover’s dream, and Trevor always has a selection of TJ and JK series Wranglers for sale, plus a healthy stock of accessories.
Give G-force a call on 01422 885555 or visit their new website
Are you carrying out your own project? If so, we’d love to hear from you. Send us some pics and info about your project and will add them to the 4×4 Magazine website.

As featured in the October issue of 4×4 Magazine.

